Article written by Ryunam
RetroArch 1.9.13 introduces a new option called “Automatic Frame Delay”. It has been added to the Latency sub-menu (found under Settings -> Latency).
This new feature provides an effective way to avoid having to configure a specific value for the “Frame Delay” option for each and every core and individual piece of content that you may want to run, by automatically tuning down its strength based on your system performance.
This is yet another contribution that empowers our long-standing efforts in reducing input latency to the lowest extent possible. We feel this new addition also gives us a good opportunity to delve further into the inner workings behind the concept of “Frame Delay” and briefly explain what purpose this functionality serves and how we generally advise our users to apply it.
What is “Frame Delay”?
The setting known as “Frame Delay” has actually existed for some time in RetroArch. However, due to its nature and the complexity of its effect, it has always required a level of strictly manual adjustment and finetuning on the user side.
To best describe the underlying mechanism, let us briefly touch upon the timing of when a new frame is produced (including when the inputs are sampled) and then displayed on-screen.

The way frames are rendered and then displayed on video can be best understood by considering this sequence:
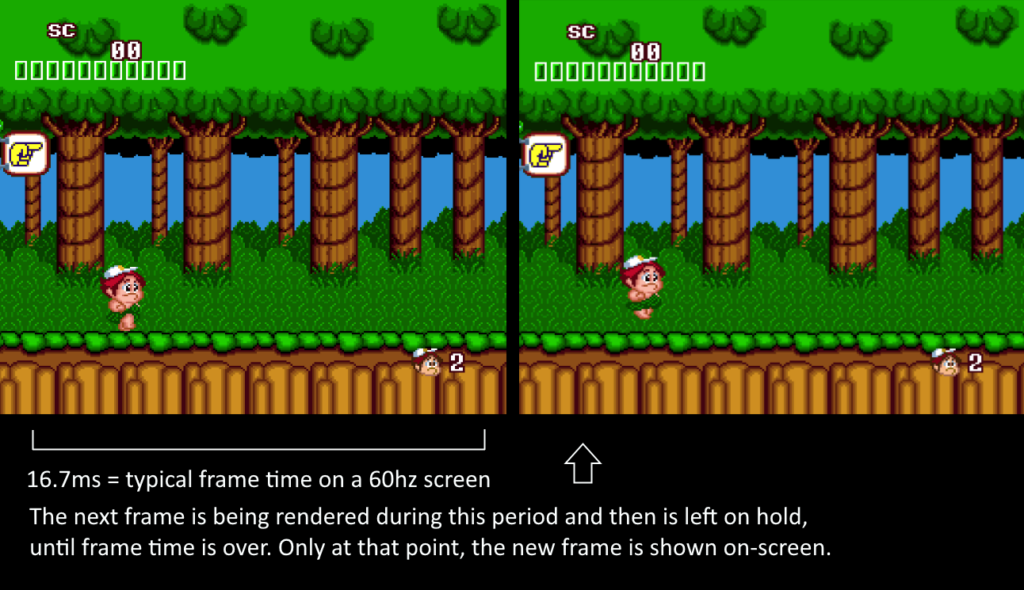
• each frame has a set duration, namely a “frame time” or “frame period” as it is usually called, which on a 60hz screen and in ideal circumstances corresponds to a length of 16.7 milliseconds on average;
• as per the picture shown above, once the first frame is shown the next frame starts being prepared “behind the scenes”. This rendering process includes the moment the inputs are polled and it all happens within the allotted frame period;
• in typical situations the rendering process of the next frame is finished some time before the given frame period is over;
• this results in the next frame essentially “stalling”, being left in a suspended state for a few more milliseconds than necessary, until the frame period is properly finished;
• only at that point the newly created frame is presented on-screen.
While the process described here is normal and does not usually yield a considerable impact on latency, the fact that the next frame has to be put “on hold” and wait a certain amount of time from the moment it finishes rendering until the end of the frame period does in fact contribute to the combined responsiveness of the inputs.
This is where “Frame Delay” comes into play.

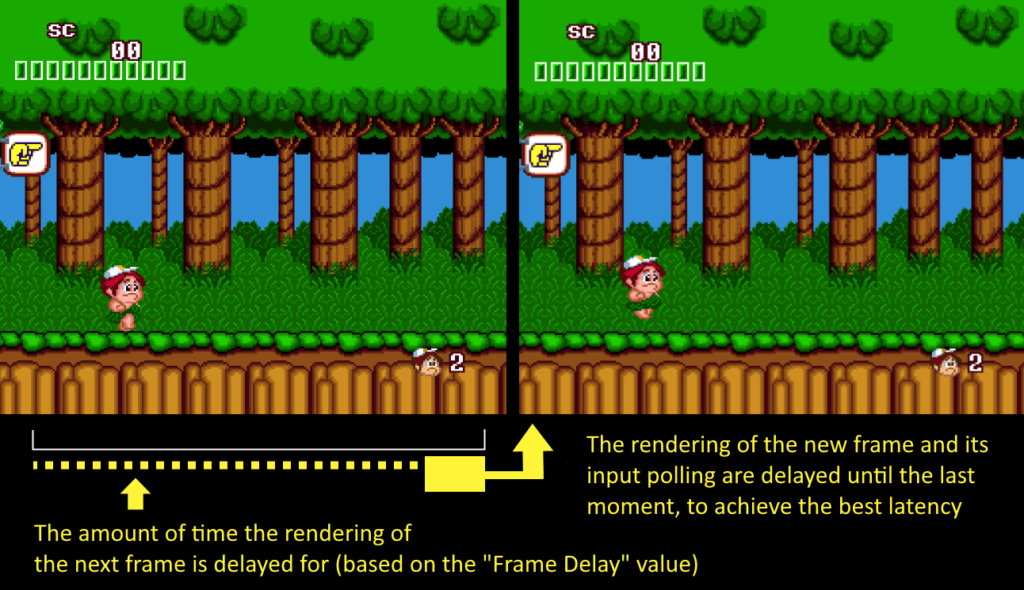
Depending on the value set for the “Frame Delay” option, the creation of the new frame including the input polling can be postponed by a certain number of milliseconds, until the last moment that is realistically viable.
Doing this requires some additional CPU processing power depending on the chosen amount of delay, but it also helps decrease the number of milliseconds that the new frame – which has been prepared and is ready to be presented on video – has to remain on hold. As a consequence, adjusting the “Frame Delay” setting can offer a slight – albeit measurable – improvement to the perceived input latency.
The “Automatic Frame Delay” setting
The problem with the “Frame Delay” setting has been traditionally that the many cores and types of content available, as one may expect, are vastly different and often have varying degrees of system and CPU requirements.
Users have had to constantly tweak the “Frame Delay” values for each specific situation, often resorting to set either per-core or per-content overrides, so that the benefits of the latency reduction could be had without stumbling on framerate drops, stutter, audio crackling and all sorts of other issues.

With the introduction of the “Automatic Frame Delay” toggle, the use of this functionality becomes simpler: the amount of delay time for the rendering of the new frame will scale down automatically, if the system detects any framerate fluctuation/drop, until it reaches a value that allows your gameplay to remain stable while still retaining a certain extent of latency reduction.
Here is a quick rundown of the different ways that you can enable and apply this setting, based on your preference:
• if you set “Frame Delay” to 0 and “Automatic Frame Delay” to ON, the starting point of the delay that is applied to the new frame will be half your “frame period”. For instance, on a typical 60hz screen with a frame time of 16.7 ms, the initial value applied will be “8”, as in 8 milliseconds of delay. Afterwards, if drops or hiccups are detected in the video performance, this value will be reduced dynamically until it reaches a stable point;
• if you set “Frame Delay” to any value higher than 0 and “Automatic Frame Delay” to ON, the starting point will be the delay value that was manually set. For instance, if “Frame Delay” is set to 10, the initial amount of delay for the processing of the new frame will be 10ms. Then, it will be adjusted downwards in case any framerate drop is detected;
• if you set “Frame Delay” to any value higher than 0 and “Automatic Frame Delay” to OFF, the automated scaling of the frame delay setting will be disabled. The amount of delay applied to the rendering of the new frame will be exactly the one chosen and will not change or decrease during gameplay at all;
• if you set “Frame Delay” to 0 and “Automatic Frame Delay” to OFF, no amount of delay will be applied to the rendering of the new frame. Frame Delay will be disabled entirely.
Conclusion
While the tangible effects of “Frame Delay” on the total combined latency might be small compared to other implementations such as Runahead, this setting has the advantage of being applicable to all cores and content, albeit to varying degrees.
The added convenience of having “Frame Delay” scale down automatically is yet another asset in making sure that you can run your content with the lowest latency possible.
Hopefully this new toggle allows a greater ease of use of this particular option for our users. We definitely encourage experimenting with it and testing it with the wide array of cores available for the libretro platform!

